File Wizard
The File Wizard offers an intuitive workflow for uploading files to either a fund or investors. This process allows admins to choose a target upload folder before assigning the file using the available matching or splitting options.
TIP: The File Wizard is accessible from the Fund Page: Documents tab and via the Bulk Uploads Page by clicking on the Upload button.
Key Areas of File Wizard
The File Upload Wizard breaks the process down into logical steps. Each step has the following key areas:
1 - Workflow Steps- Indicate the total number of steps in the workflow and where users are in the process. A green checkmark next to the step indicates that the step is completed.
2 - Status - Indicates the status: Draft, Processing, Pending, or Published.
3 - Selection Area - Allows admins to select various options and enter details. As admins move through the workflow, it allows them to select the upload type (Fund vs Investor), destination folder, upload files, validate file assignments, etc.
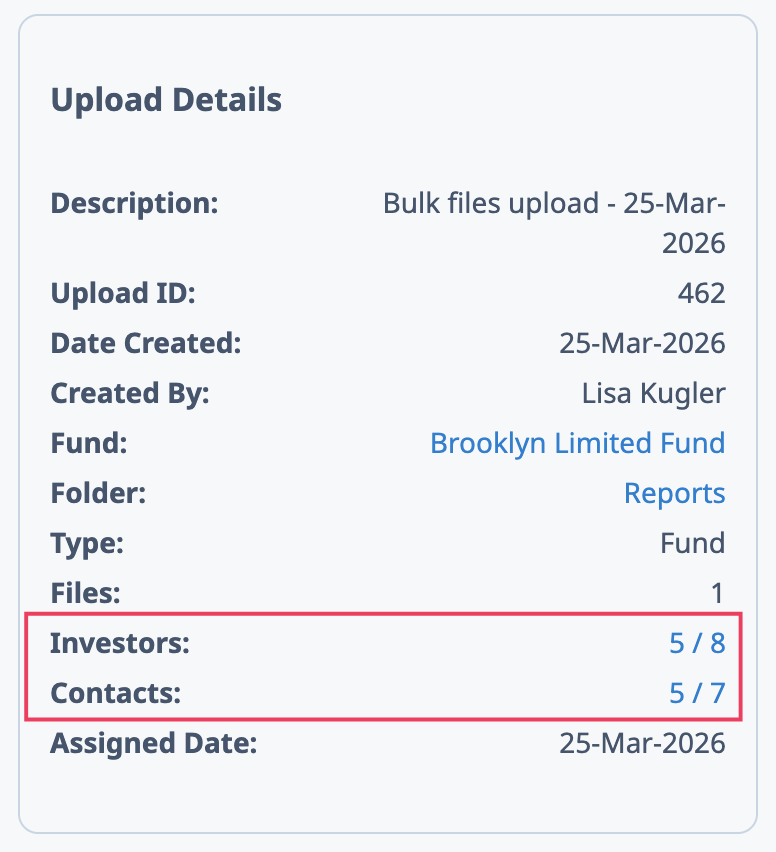
4 - Upload Details - Provides a live summary of the upload as admins move through the workflow.
5 - Action Buttons - Allows admins to move forward or back through the process or delete the upload, as well as revert to pending for published uploads.

NOTE: The Delete button is available after completing Step: 1 and on every step of the Wizard.
TIP: The Back button allows you to navigate to the previous step. Should you make any changes, you can continue through the workflow or use the Discard Changes button.
Upload to the Fund
The graphic below shows an example of how admins would upload files to the fund.

The Tracking ID is optional and can be completed as needed. For example, use this field if you are using any other system to track the Bulk File Upload such as Salesforce.
TIP: Use the Make read-only checkbox at Step: 1 EnterDetails to upload read-only files restricted from the ability to print or save (download). This is only applicable to PDFs. Click here to learn more about read-only documents.

- Filenames can be manually edited by typing into the field.
- Files can be removed by clicking on the X. To add files to an existing upload, use the Back button to return the Upload File Step and add files as needed.
Upload to the Investor
The graphic below shows an example of how admins would upload files to the investor.

When uploading to the investor, an additional Step 3: Assignment is added to the workflow to select the appropriate mode depending on the option selected below:
- Match
- Select matching criteria, as required. Hover over the tooltip icon for more details.
- File name field can be used to create naming convention with variables for the upload. To format a file name using variables, use curly brackets around each variable within the file name:
- {{ Investor ID }}
- {{ Partner ID }}
- {{ Investor }}
- Split (only PDF file types supported)
- Select split parameters, as required. Hover over the tooltip icon for more details.
- File name is mandatory during a split. Admins have the option to add variables to the file name.
NOTE: Default Splitting options are Investor ID, Partner ID, Investor Name. If you would like additional splitting options, please contact Client Success.
How to Add Variables to the Filename
The Add Variable button works in conjunction with the file name field. When establishing a file name convention for an upload, admins have the option of including variables in the file name (e.g., adding Investor Name to personalize the file).
To add variables, click on the desired location in the file name textbox to place your cursor and click on Add Variable. This will display a menu of variable options. Once selected the system places the variable in the position of the cursor.
- Assign date - adds the date selected in Step 1 to the filename
- Investor - adds the investor name
- Investor ID - adds the Investor ID
- Partner ID - adds the Partner ID
- Upload ID - adds the Upload ID
You also have the ability to drag variables around to change position. Standard keyboard functions such as delete, and backspace will remove them. Keep an eye on the file name example as it updates with the variable selections to preview.
Understand the Summary Page
The Summary Page shows an overview of all files that are included in the upload. Refer the graphic below for more details.

- Summary table - The status totals in the top left corner show the total number of matched and unmatched files. To check the matching status of each file, refer to the status column. You can preview any file that has been matched—either automatically or manually—across different sections of the portal.
- Upload status - The upload is now considered to be in Pending state. Published uploads will reflect a Published status.
- Download proof - The Report Summary downloads the Upload Details and the table as a PDF. The Download All option provides a ZIP file that includes the Report Summary along with all the files from this upload.
- File ID - Clicking on the File ID hyperlink will open the file in a new tab. Admins have the option to change file names one-at-a-time by clicking into the File text box to edit.
- Investor dropdown - This field displays the investor that matched with the file. The information in the parentheses displays the matching or splitting criteria that was used for the upload.
- Assigned date - This date was set in Step 1: Enter Details. It can be changed manually for each file.
- Investors/Contacts with permissions - The number to the left of the forward slash ("/") represents the investors or contacts who have both matched and have access to view the folder. The number to the right indicates the total number of investors and contacts in the fund.
- Save Changes/Publish - Admins have the ability to save progress by clicking this button. Publish will publish the upload. For published uploads, these buttons will be replaced by the Revert to Pending button, allowing admins to unpublish the upload.
- Delete - Click Delete to delete the upload.
IMPORTANT: When a folder is selected a yellow alert appears to notify if there are any contacts that do not have permissions to access the folder. To review, click the investors/contacts numbers (e.g., 32/35) located in the upload details section to open Permissions in a new tab. Edit permissions as required.
TIP: If permission have been updated while a bulk file upload is in progress, be sure to refresh the bulk file upload page after editing to ensure the correct numbers are reflected in the upload details.
Accuracy Controls
The File Wizard has various controls to ensure accuracy and completeness prior to publishing. It is recommended that you review these controls in the following areas:
Upload to Fund Accuracy Controls
- At the Review step, a yellow banner appears with a list of investors and contacts who do not have permission to view the upload. This includes any investors who have transferred out of the fund earlier than the assigned date of a file upload. Confirm Contact Permissions if needed.

-
At the Review step, final Investors and Contacts counts are reflected in the Upload Details section.
- At the Review step, the Download Report button allows you to review a Report summary PDF of the upload, including the Investors and Contacts count for validation.


Upload to Investor Accuracy Controls
- At the Review step, once the investor is selected from the menu and the Save Changes button has been clicked, an investor-specific yellow alert appears with a list of investors and contacts who do not have permission to view the upload. This includes any investors who have transferred out of the fund earlier than the assigned date of a file upload. Confirm Contact Permissions if needed.

- At the Review step, once the investor is selected and the Save Changes button is clicked, the final Investor and Contact counts will be reflected in the Upload Details section.

NOTE: The Publish button is disabled until an Investor is selected from the dropdown menu and the Save Changes button is clicked.
NOTE: If none of the contacts associated with the matched investor have permissions, then the investor does not have access.
- At the Review step, use the Download Report button to review a Report summary PDF of the upload, including the Investors and Contacts count for validation.
