Functions: Integrations - Docusign
Sensr Portal allows you to streamline signature collection for funding events, documents renewal or any other event that requires your investors to sign documents online. You can present documents for signing to your investors when they enter the portal and automatically upload the documents to the investor's files once the documents are signed by all signers. You can track where all investors are in the document signing process and reduce the number of email communications required to have your investors sign the relevant documents.
There is a setup step, followed by three main steps to set up your first Docusign action on the Portal:
- Create the Template on Docusign for each investor type (e.g., Natural Person, Natural Person + Spouse, Trust, IRA Account, etc)
- Create an action on Sensr Portal that connects to the Docusign Template
- Assign the action to the appropriate users on Sensr Portal
NOTE: Once documents are signed the documents will be visible in the Investor Details page: Documents tab. They will also be visible in the Investor view of the Portal under the Documents tab.
To connect your own Docusign account, you must first ensure that your account supports Power Forms. If so, notify Sensr Portal that you are interested in using the Docusign integration with your own account.
Connect Your Docusign Account to Sensr Portal
Enable Automatic Document Upload to Sensr Portal (webhook)
Create the Template on Docusign
Create an Action that connects to the Docusign Template
Assign the Action to the Appropriate Users on Sensr Portal
Connect Your Docusign Account to Sensr Portal
In order to set up this integration, you must first login to your Docusign account and navigate to the Admin dashboard. The Admin dashboard is accessible under the Settings tab on the main Docusign page.
Enable Automatic Document Upload to Sensr Portal in Docusign
- In Docusign, find Signing Settings on the admin dashboard.
- Ensure Attach documents to completion email is checked in the Envelope Delivery- this ensures that Sensr Portal will be able to pick up each signed document and upload it.
- Return to the Signing Settings.
- Click on In-session Landing Pages under Signing Experience,
- This allows you to specify a specific destination URL for different actions taken by in-session signers.
NOTE: Docusign may change the layout of any of the button mentions without notice. If you have any issues, contact Docusign Support for assistance.
Set the In-Session Landing Pages
- Navigate to Functions and click on Integrations.
-
Under DocuSign PowerForm Integrations section, copy the URL found under:
(DocuSign Admin -> Settings -> Signing settings -> In-session Landing Pages -> Finish Later)
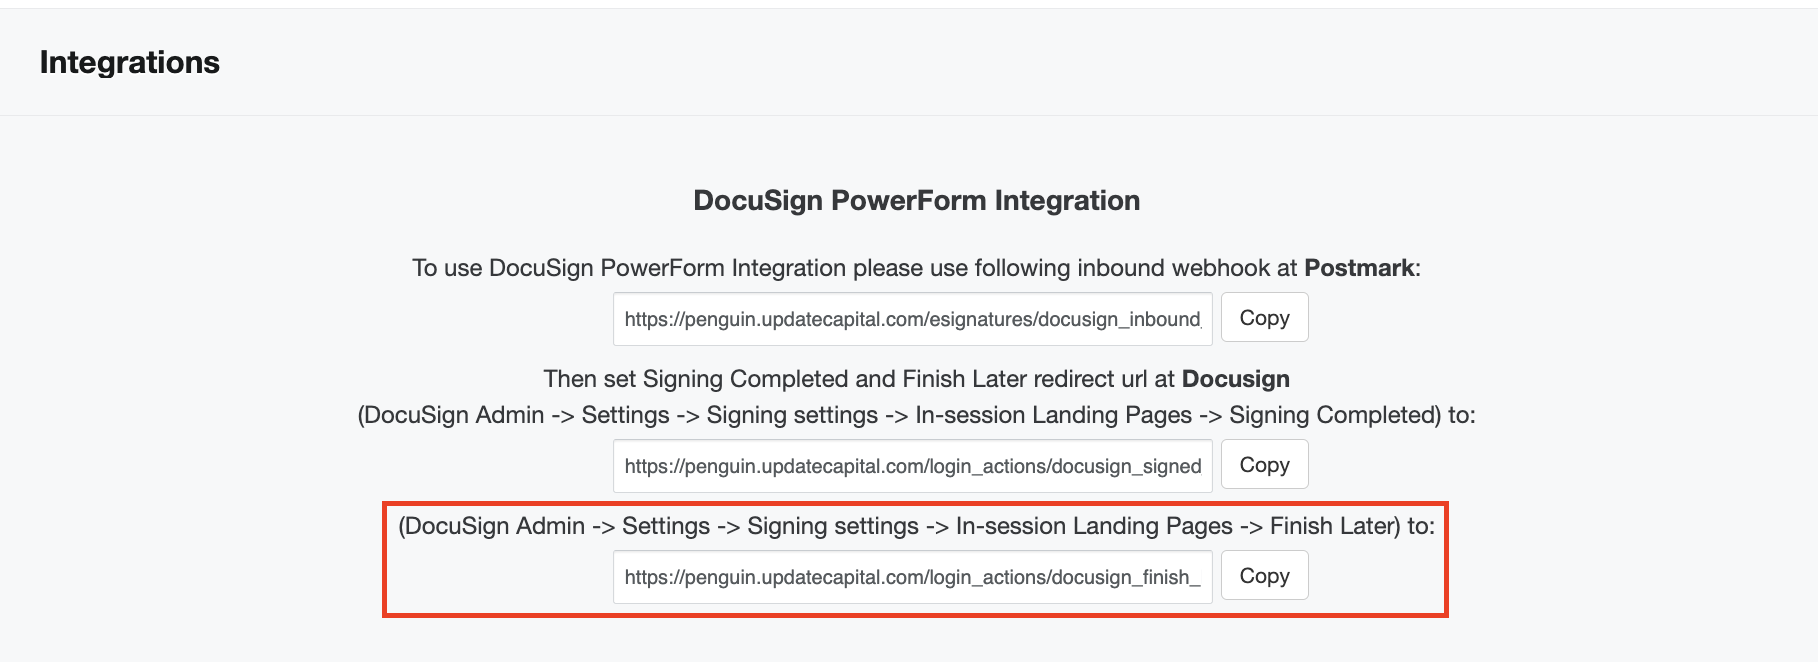
- Paste the copied URL to the Finish Later field on Docusign's page.
-
Next, return to the Sensr Portal DocuSign PowerForm Integrations section and copy the URL found under:
(DocuSign Admin -> Settings -> Signing settings -> In-session Landing Pages -> Signing Completed)

- Paste the copied URL to all other fields on Docusign's page.
- Last, return to Docusign settings where all URLs from Sensr Portal have been pasted and click the Save button.


Create the Template on Docusign
You will need to set up your Docusign templates on Docusign for each investor so they are ready for seamless use on the portal. This step sets off the set up process.
- Create a Template on Docusign for each Investor Type
- Setup a Docusign Template
- Add Fields to the Document
- Add Configurable Fields to be Populated by Data from Sensr Portal
IMPORTANT: Docusign has changed their system of sharing configurable fields with third parties such as Sensr Portal. For any configurable fields you intend to use with Sensr Portal, we require that you start every field name with "UC-_____" .
Create a Template on Docusign for each Investor Type
In order for you to take your investors through an action to sign a document on Sensr Portal, you must first create the Docusign template(s). In a typical funding process, investors might invest using different investor contact types, such as Natural person, Natural Person + Spouse, Trust, IRA Account, or any other entity type. Sensr Portal allows you to configurable the fields the investor will need to fill in during the signing process by entity type. This is done by building a separate DocuSign template for each investor type.

Setup a Docusign Template
- In your Docusign account Create a New Tempate.
- Be sure to give the template a Name and Short Description. For example: Subscription Agreement - Natural Person, Subscription Agreement - Natural Person & Spouse, etc.
- Upload the appropriate agreement as the document.
NOTE: Sensr Portal currently supports one document per Docusign template.
- Next, add the roles for each participant in the document signing process.
- For each participant, create a role for that participant and set the role to NEEDS TO SIGN.
- After each participant, add a role called Sensr Portal and set it to RECEIVES A COPY.
- The example shown in the image below displays the recipient layout for an agreement that needs to be signed by the Investor, Spouse and then counter-signed by the Sponsor (you). The role Sensr Portal is listed after each step as RECEIVES A COPY.
IMPORTANT: Each Sensr Portal role for RECEIVES A COPY is required for Sensr Portal to provide a status of where in the process a document signing is.
- Ensure the signing order is correct in Set Signing Order so that each NEEDS TO SIGN role is followed by an Sensr Portal RECEIVES A COPY role.
-
Be advised the Signing Order should be displayed as a sequence, with one role coming after another has been completed (as seen in the picture below). UC should be assigned for every even number role. If the order is not sequential, uncheck Set Signing Order and then recheck it, this should set the signing order to be sequential.
IMPORTANT: In order for the signing process to work correctly in Sensr Portal, the following conditions require :
- No roles are listed in parallel on the signing order.
- To ensure progress tracking, each signer is followed by an Sensr Portal CC role.
- The very last role in the signing order must be an Sensr Portal CC role.
- Click Next at the bottom of the page to continue with the creation of your template.
Add Fields to the Document
After setting the signing order, you will need to add the appropriate fields to the document. Fields can be added separately for each signer role. To position the fields on the document, drag in the appropriate fields and place them in the desired area. Repeat the process for each signer role.
Add Configurable Fields to be Populated by Data from Sensr Portal
Adding Configurable Fields to a template allows pre-populating the document with many data items available on Sensr Portal.
For example, the Amount and Investor configurable fields are pre-populated during the signing process with the amount and entity associated with the signer in Sensr Portal.
- When creating a configurable field, you must set them to type Text on DocuSign, and set Validation to None.
- Consider marking configurable fields as read-only so they cannot be changed by the participants signing the document, for example, when adding the Amount configurable field, set it to type Text, set the initial value to $0, and check Read Only:
- Then select the configurable field created and drag it onto the document where we need it.
NOTE: When adding a configurable field to a document, the first role must be selected (investor). Configurable fields added for other roles will not allow Sensr Portal to pre-populate the data:
- Once the template has been populated with the fields, click Save and Close, the template will now be available on My Templates in your Docusign account.
Repeat the Process to Create a Template for Each Investor Type
Using the same PDF document, repeat the steps above to create a new DocuSign template for each investor type that participates in the funding process. A typical process involves:
- a template for a Natural Person
- a template for an entity (an LLC, for example)
- a template for a Natural Person and Spouse
- a template for a trust, and a template for an IRA account.
You can use Docusign's "copy template" functionality to quickly copy an existing template and edit the roles and fields of the newly created template to match the needs of a different entity type.
Create an Action that Connects to the Docusign Template
- Create an Action that Connects to the Docusign Template
- Download the Docusign Template
- Generate a PowerForm
- Set up Multiple Signers
NOTE: Docusign has changed their system of sharing configurable fields with third parties such as Sensr Portal. For any configurable fields you intend to use with Update Capital, we require that you start every field name with "UC-_____"
IMPORTANT: Be advised, the system only allows one Docusign template to be added per action.
Download and Add the Docusign Template
- On the Docusign My Templates page, download the template you want to connect to the Portal action.
- Click the Choose File button to upload the downloaded Docusign template to the Docusign action created on Sensr Portal.

- Proceed to the next step to generate a PowerFormURL . Once both are completed, click Create Template.
Generate a PowerForm URL
- In Docusign, navigate to the My templates and select Create PowerForm to find the template to connect to the action. If you've already created a PowerForm for this template, click on the template name, which will open the template page and copy the PowerForm URL at the end of the page.
- Review the Create PowerForm page details and then click Create.
- A PowerForm URL pop up window appears with the URL Link and Embed code. Click Copy.
- To copy a URL for a PowerForm already created, go to the template page where Associate PowerForms are listed. Click on Actions next to the PowerForm and click Copy URL.
- After copying the URL, return to Sensr Portal and paste the copied URL to the PowerForm URL field.

- Click Create Template .
Set up Multiple Signers
IMPORTANT: Sensr Portal supports multiple signers provided the Docusign template is configured properly with the counter signer info (name, email and role). Refer to the Docusign template settings for details.
Once you've completed the above step, arrive on the Docusign Template page. Here you will verify the template Name and Signers (including any co-signers). If applicable, you can select what Custom Fields should be replaced with to connect each custom field from Docusign with the respective data in Sensr Portal.

Template section
- Name will be populated with the Docusign template name by default, which is also used as the filename of the saved document associated with the contact/investor after the signing process.
- Verify the template Name and Docusign PowerForm URL.
Signers section
- Signers lists the name and type of each signer. Use the Type menu to select the type of signer or each signer. Types include:
- Logged in contact (most common selection)
- Ask during Signing
- Pre-populated email address (often reserved for additional signers/counter signers)
TIP: In cases where an additional signer is required, the type should be set to Pre-populated email address. Setting this signer type requires the portal admin to enter the name and email address of that signer in order for them to receive the signature document via email from Docusign.
Custom Fields section
select what you would like Custom Fields to be replaced with to connect each custom field from Docusign with the respective data in Sensr Portal.
- Custom fields are pre-populated with data from Sensr Portal. When the contact signs the documents, this data will be populated in the document based on the contact's investment details. This allows you to connect each custom field from Docusign with the respective data in the portal.

When you have set the signers and custom fields, click Update. This will connect the Docusign template to the portal action. At this point you are ready to assign the action to the appropriate contacts.
NOTE: Once all documents are signed, they will be saved on the Investor Details Page: Documents Tab. The investor will also be able to view the signed document on their documents page.
Assign the Action to the Appropriate Contacts on Sensr Portal
After you create a Docusign signing action on the portal, you will need to assign the action to your investors. Refer to Understand Actions and Functions: Actions for details.