Data Wizard
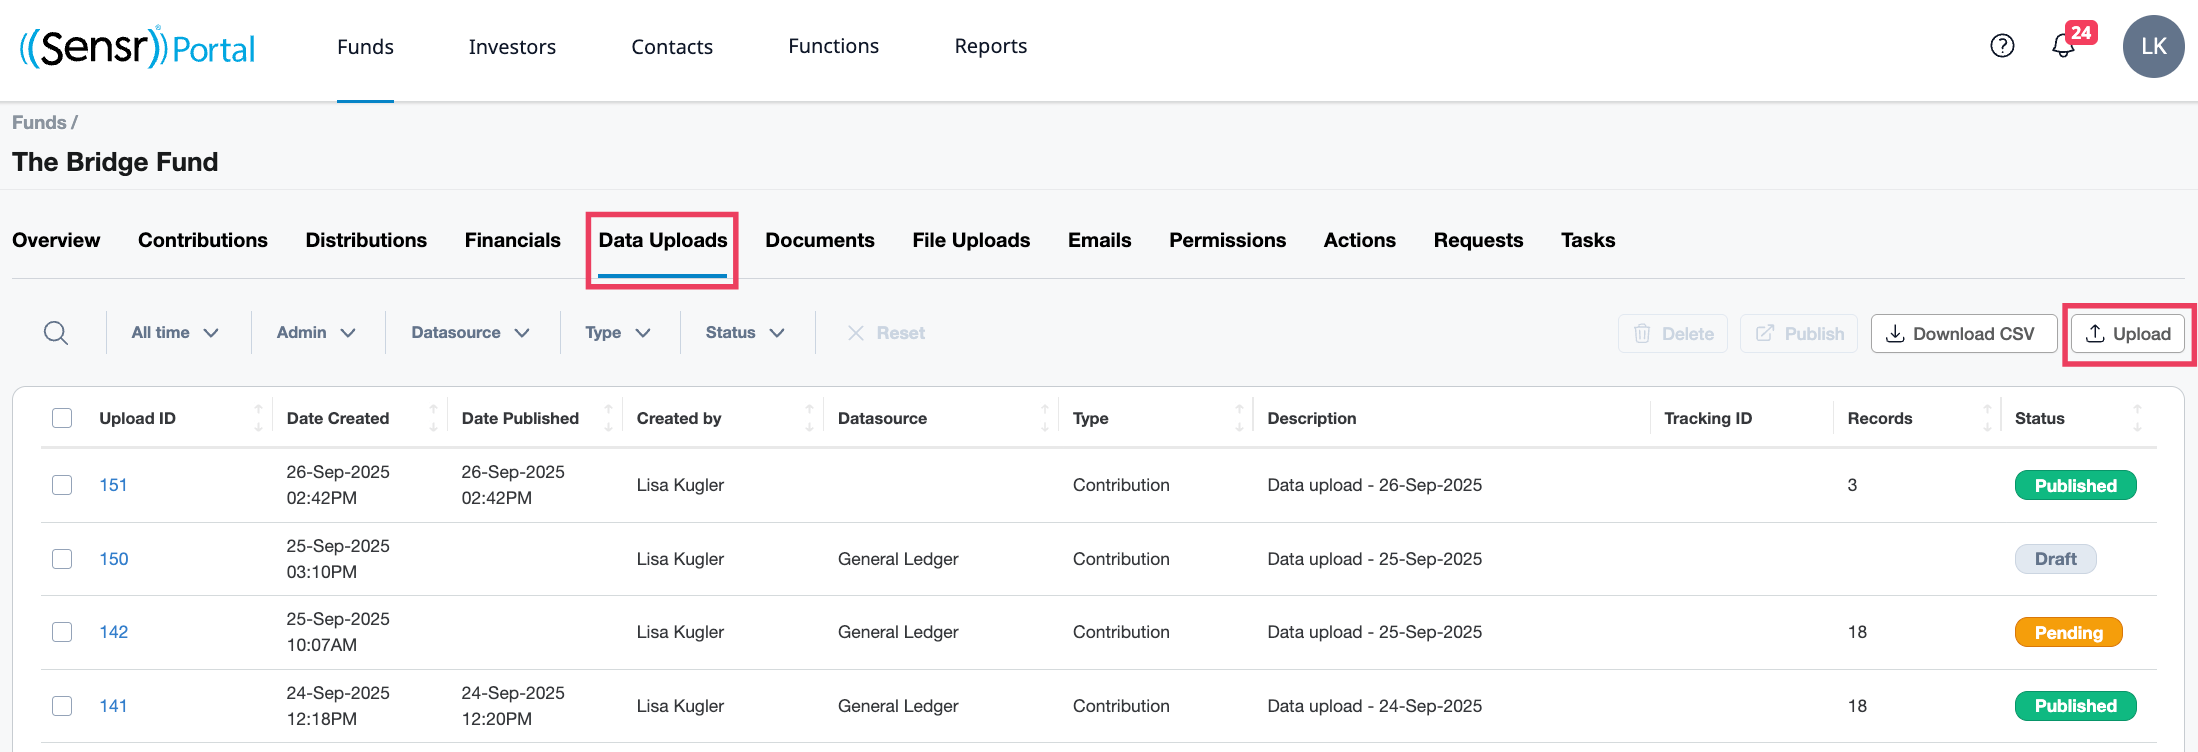
The Data Wizard offers an intuitive workflow for admins to upload Contribution, Distribution and Financial data on the Fund Details Page: Data Uploads Tab. The Data Wizard is also accessible via the Functions: Data page. Click the Upload button to launch the wizard in either pathway. Data is first uploaded with a Pending status before being validated and published.
Key Areas of Data Wizard
The Data Wizard breaks the process down into logical steps. Each step has the following key areas:
1 - Workflow Steps - Indicate the total number of steps in the workflow and where users are in the process. A green checkmark next to the step indicates that the step is complete.
2 - Status - Indicates the status: Draft, Processing, Pending, Published
3 - Selection Area - As admins move through the workflow, this area allows them to make selections as required.
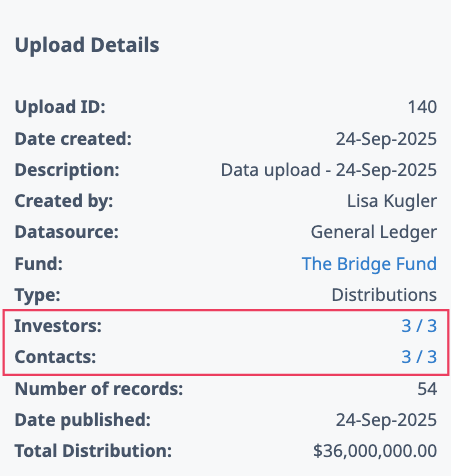
4 - Upload Details - Provides a live summary of the upload as admins move through the workflow.
5 - Action Buttons - Allows admins to move forward or back through the process or delete the upload, as well as save changes before publishing and revert to pending (Back, Save Changes, Move to Pending, Delete).
IMPORTANT: When using the Delete action button, always delete the most recent upload first.

Use the Data Wizard
- Navigate to the Functions menu and select Data.
- Click Upload to launch the wizard.
-
The Data Wizard is also accessible from the Fund Details Page: Data Uploads Tab.

Step 1: Enter Details
Review the various fields and options available:
- Select data upload type -
- Contributions - data will be uploaded to the Contributions tab in the fund
- Distributions - data will be uploaded to the Distributions tab in the fund
- Financials - data will be uploaded to the Financials tab in the fund
- Select the Fund - use the drop-down menu to select the fund
- Description - by default the date upload date is added; use the field according to your needs
- +Add Tracking ID (optional) - click to add an optional tracking number
- Click Continue.

Step 2: Select Datasource
When uploading data, there are four different methods: Upload File, Import from General Ledger, Add Manually and Add Prorated Amounts.
Upload File
For this upload method, use the Drag and Drop feature or click Select CSV to upload a CSV file. Only a single file can be uploaded. Once the file is successfully uploaded, click Continue.

Import from Gen II General Ledger
To import from Gen II General Ledger, enter the required Timeframe and End Date and click Continue. If there were any previous imports from the General Ledger, details are indicated in the bottom left corner.

NOTE: To enable the Import from General Ledger feature, contact Portal Customer Success.
Add Manually
To add records individually, use the Add Manually button. This brings you to the page where you can add each record manually, as indicated in the next image below.

Click the +New Row button to add a new row. In this case, any entered data will be uploaded as is and the signage will not change. Once all needed data is added, click Continue.

Add Prorated Amounts
This option is only available for Contributions and Distributions. Depending on the data type, complete the form as needed and click Continue.

NOTE: To generate prorated contribution or distirbution amounts, contact Client Success to enable it in the Data Wizard.
IMPORTANT: Sensr Portal will flip the signage of contribution amounts in the upload file before uploading the data.
Step 3: Data Mapping
This step allows you to map the portal fields to the columns in the source file to ensure the system is looking at the right column when uploading data. To proceed to the next step, each mandatory field must be matched to one of the columns in the source file. Any non-mandatory field will be skipped and not be included in the upload.
Column Headers
Portal field - standard fields in the portal, listed in the order they appear in the system.
Mandatory (yes/no) - indicates if the field is mandatory or not.
Type - Number, string, date, dollar amount.
Data upload field - the column headers from the source file.
Status - Matched, Not Matched, Manual., The system initially attempts to map portal field names to the column headers such as Investor ID, provided the column headers are labeled correctly.

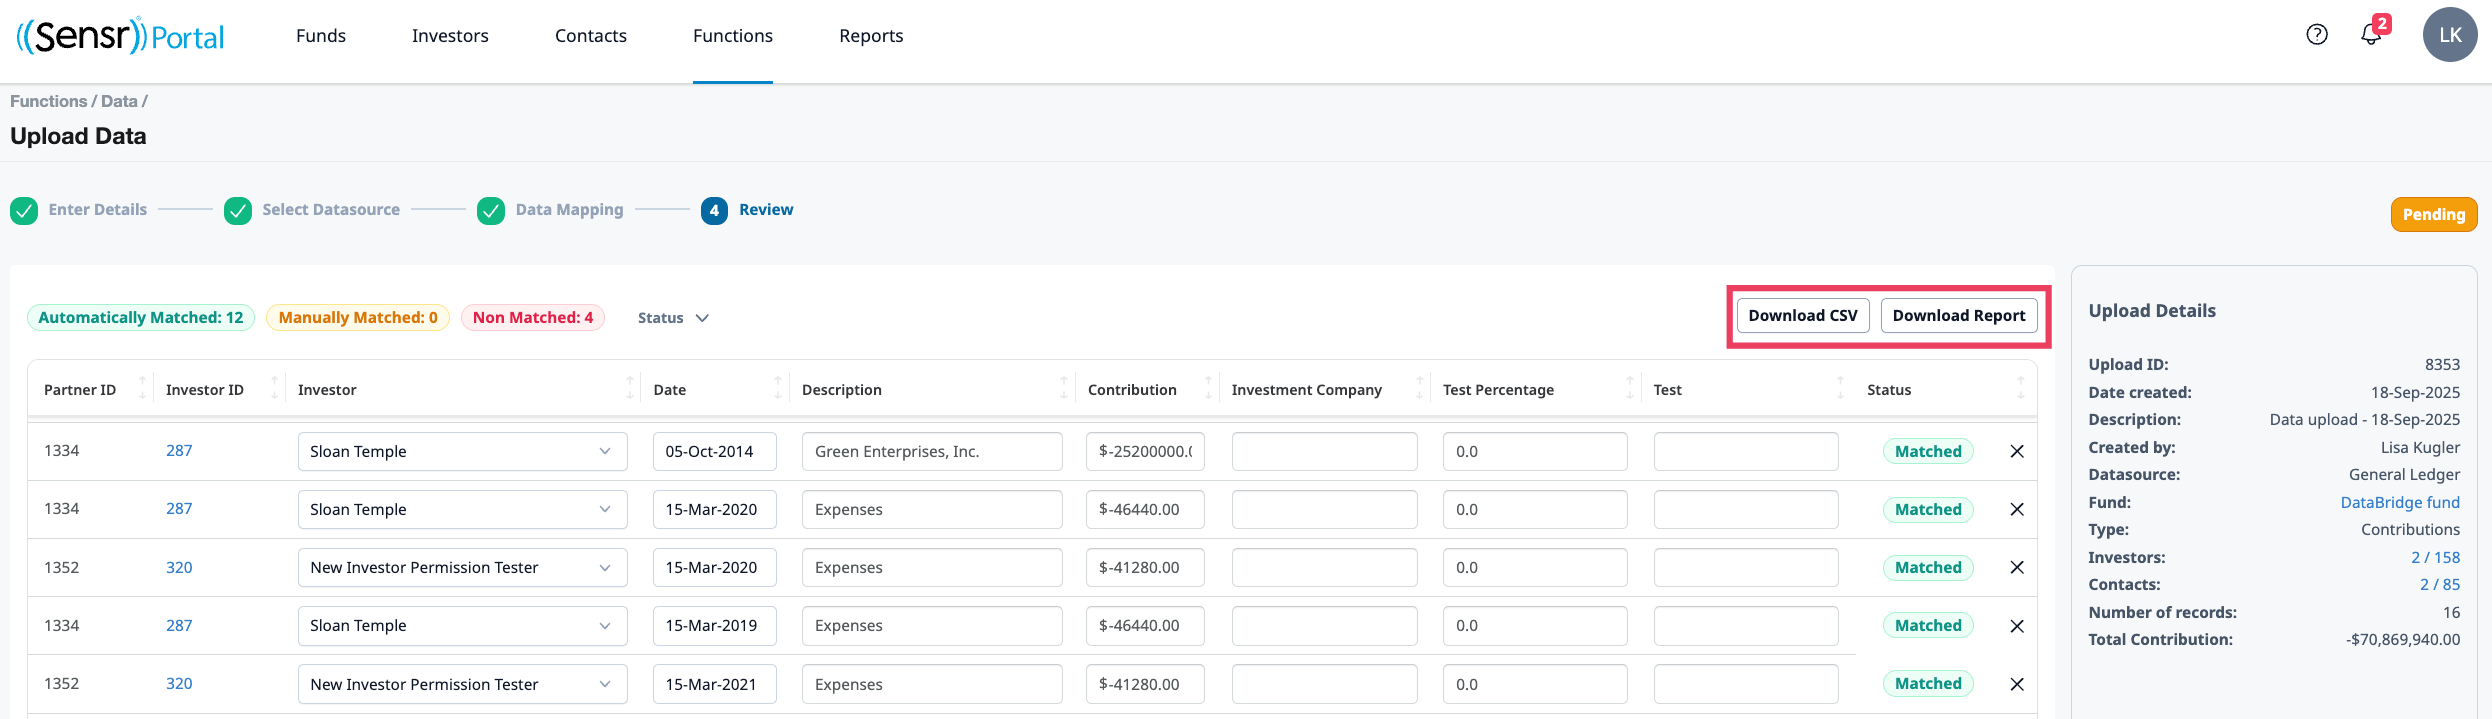
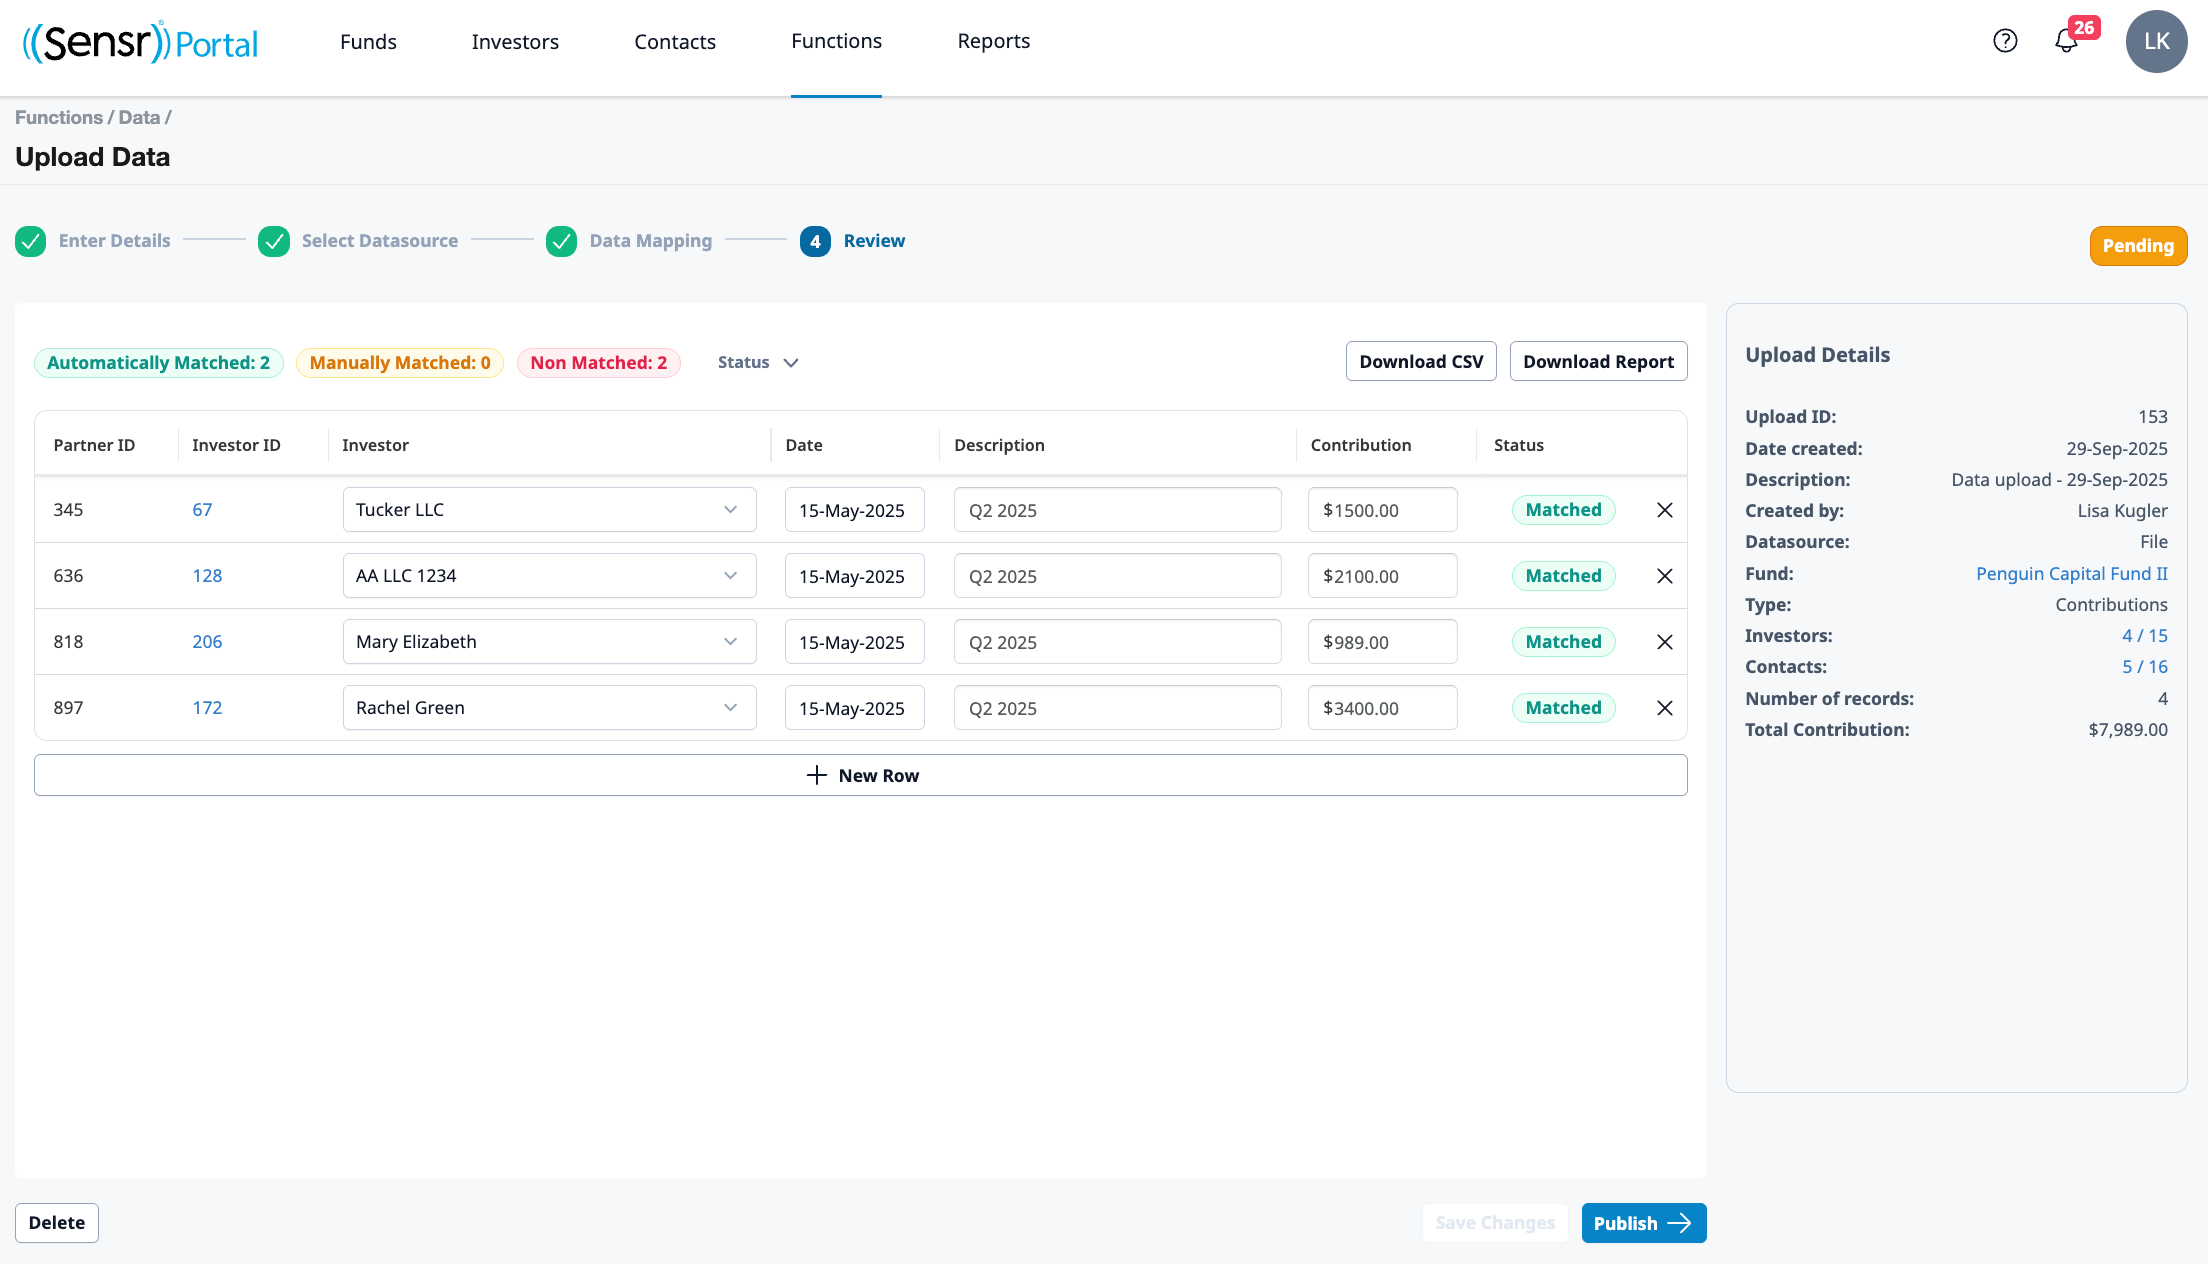
Step 4: Review
The Review page displays an overview of all uploaded data in a Pending status. Verify the table and ensure all rows are matched before uploading data. You cannot publish this data until all rows have a status of Matched or Manual.
IMPORTANT: It is not possible to go Back to a previous step. If you need to make any changes, you must delete this pending upload and start over.
- If there are any investors or contacts who do not have access to the data in the system, a yellow banner is displayed. Use the hyperlinks to view each investor and contact access on separate browser tabs. Refer to the Data Accuracy Controls below.
- Use the Download CSV button to download a CSV of the table.
- The Download Report button provides the table and Upload Details summary (pdf format).
- Upload Details section displays the count of investors and contacts that have access to this data.

NOTE: The Revert to Pending button is only visible for Published uploads.
Data Wizard Accuracy Controls
Sensr Portal has multiple controls to view and verify the data upload before you hit Publish. It is recommended that you use the controls to validate the data.
-
In Step 1: Select Data Upload Type - if there are any pending or draft Financials uploads for the fund; you will not be able to proceed to Step 2 until the pending upload is either published or removed before uploading new data.

-
Be sure to review the Upload Details section for Investors and Contacts counts which appear on Step 2: Upload File and onwards. Ensure that the investor and contact counts match investor / contact permissions. Click on the link to navigate to those pages.
-
Step 4: Review a Yellow banner list of investors / contacts who do not have access to the data.


-
Use the Download CSV to compare the source file to verify it matches. Or, use the Download Report button to review the PDF summary of the entire data upload, including investor and contact counts.
-
Pending view on Step 4: Review allows users to preview the data in various locations in the portal to validate the upload. *Pending data is only visible to admins.


Troubleshooting Guide
| Error Description | Cause | Solution |
|
Step 2: Select Datasource Continue button is disabled |
One or more of the following:
|
|
|
Step 3: Data Mapping A yellow alert indicating duplicate columns are not allowed. |
One of more of the following:
|
|
|
Step 4: Review The source file has a value, but data is missing from the review step. |
The source file has an incorrectly formatted column or invalid entry. | Ensure the data is corrected and re-upload. Or, simply enter the correct data into the empty field. |
| Step 4: Review Investor ID and Investor are blank. |
One or more of the following:
|
|
|
Step 4: Review A mandatory field is not populated with data. |
Mandatory information was not provided in the source file. | Ensure the source file has the required data. |