Manage Documents
When it comes to managing documents in Update Capital, there are two important pieces of information to be aware of:
File Types
It's important to differentiate between four types of files in order to ensure that access is limited to the right audience. For more information on role-based filesystem permissions, click here.
- Fund Files: available to all contacts who were given access to a specific fund and all contacts who have an investment in that fund. These include marketing materials and agreement templates.
- Investment Files: assigned to a specific investment in a specific fund, and are available only to admins and the contact who made that investment. These include signed agreements and individual statements.
- Contact Files: available to a specific contact only. These include investor accreditation letters and revenue-sharing agreements.
- Entity Files: available only to contacts who own the entity, these include documents such as revenue sharing agreements or entity-specific documents.
IMPORTANT: We strongly recommend the use of PDF documents when uploading files. Other file types may be used in circumstances when it is not possible to convert a document to PDF.
NOTE: Recently added documents on the Investor portal refers to any files that have been added to a folder within the last quarter (90 days). The Recently Added section will show the two most recent files that have been added to the folder.
Upload files specific to a fund
Upload files specific to an investment
Upload files specific to a contact
Upload files specific to an entity
Upload Files Specific to a Fund or Fund
- Click on the Funds tab in the main menu.
- Select a fund.
- Click the Documents tab.
- Then, click on Upload. This will launch the File Upload Wizard. Simply follow the workflow instructions from there.
Upload Files Specific to an Investment
To bulk upload files to many investments at once (such as uploading K-1s), follow th Bulk File Uploading Tutorial
- Click on the Funds tab in the main menu.
- Select a fund.
- Click on the Financials tab.
- Click View to the right of a specific investment.
- On the Files section click the Upload button on the Files panel.
- Select file(s) to upload. Then, select the group to Grant Access to in the popup window,
- Click Save.

Upload Files Specific to a Contact
- Click on the Contacts tab in the main menu.
- Click the related contact profile.
- Click on the Documents tab.
- Click Upload.
- Select file(s) to upload. Then, select the group to Grant Access to in the popup window,
- Select Calendar Type timeframe from the dropdown menu, if enabled.
- Click Save.

IMPORTANT: Sensr Portal recognizes the need to add calendar type and date periods when managing file uploads. This feature is available upon request. Please Contact Customer Success for more information.
Upload Files Specific to an Investor
- Click on the Contacts tab in the main menu.
- Click a contact profile.
- Click the Documents tab.
- Click Upload.
- Select file(s) to upload. Then, select the group to Grant Access to in the popup window,
- Click Save.
File Access Permissions, and what they mean
When uploading files (at the fund, contact, investment, or entity level) you will be prompted to select a Grant Access to group to view the file(s). These role-based filesystem permissions offer two layers of security to protect your files and ensure the correct contacts have access to the right documents. Role-based group descriptions are listed below.
- Admins Only
- This means files can only be accessed by logged-in admins and on one else. *When a file is uploaded by an Admin on the Fund page, the file is marked in gray as Admin only.
- Admins and specific contacts
- This means files can only be accessed by logged-in admins and logged-in contacts that are specified by the Admin.
- Admins and Contacts
- This means files can be accessed only by logged-in admins and logged-in contacts
- Upload permissions can be customized by an admin on the Preferences page to manage any files uploaded by a contact via an Action.
- Sensr Portal also offers various ways to control which contacts can access a fund.
- Public
- This means files can be accessed by logged-in admins, logged-in contacts, and anyone else with access to view publicly available pages.
- Permission Manager
TIP: Refer to this article when working with Multiple Investor Owners as it relates to Permission Manager use of documents and modifying access to previously uploaded files.
NOTE: Public files will be marked with red text beside the file name to indicate to the admin that the file is publicly available to view.
Edit or Remove File Permissions
- From the Fund page, navigate to the Documents section at the bottom of the page.
TIP: You can also edit or remove files on the Contact page of an individual investor if needed.
- Click Edit to the right of the file name you want to edit.
- Verify the File/Folder name in the Edit pop-up window and use the Grant access to menu to make your modification.
- Click Save.
To remove a file after it's been uploaded, simply locate the file in the Files section and click on Delete located to the right of the file name.
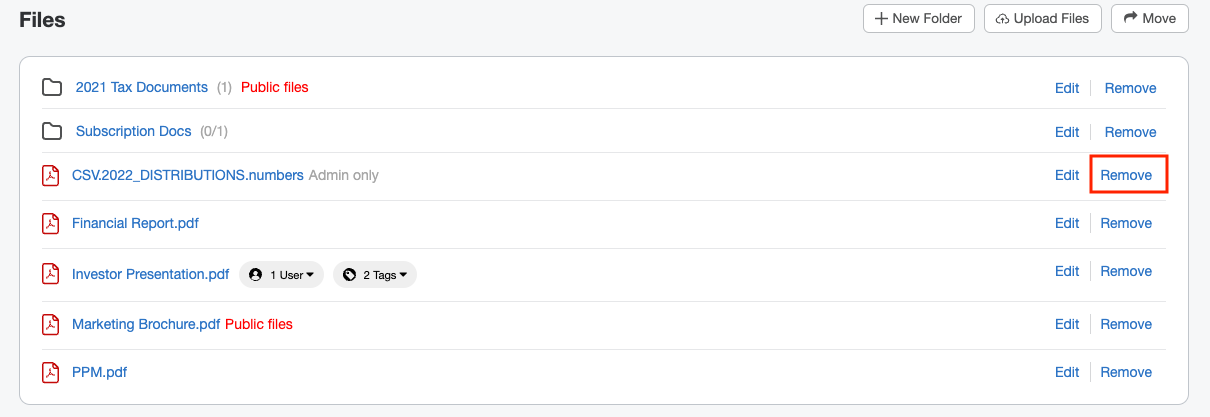
- A pop-up window appears asking you to verify the action. Click OK.

NOTE: Although removing a file is an irreversible action, you can always re-upload any files that may have been deleted in error, provided you still have the file.