Email Wizard
The Email Wizard offers an intuitive workflow for admins to create and send emails, as well as fund updates to investors. This process allows admins to compose an email, select recipients and review before sending. Accessible from the Fund Details Page: Emails Tab, the Email Wizard is also available via the Functions menu on the Functions: Communications - Emails tab. Click Compose to launch the wizard in either pathway.
Email Wizard Accuracy Controls
Key Areas of Email Wizard
The Email Wizard breaks the process down into logical steps. Each step has the following key areas:
1 - Workflow Steps - Indicates the total number of steps in the workflow and where users are in the process. A green checkmark next to the step indicates that the step is completed.
2 - Status - Indicates the status: Email Draft, Update Published, Email Sent
3 - Selection / Composition Area - As admins move through the workflow, this area allows them to make selections as required.
4 - Email Details - Provides a live summary of the email as admins move through the workflow.
5 - Action Buttons - Allows admins to move forward or back through the process or delete the email, as well as save changes before publishing.

Use the Email Wizard
-
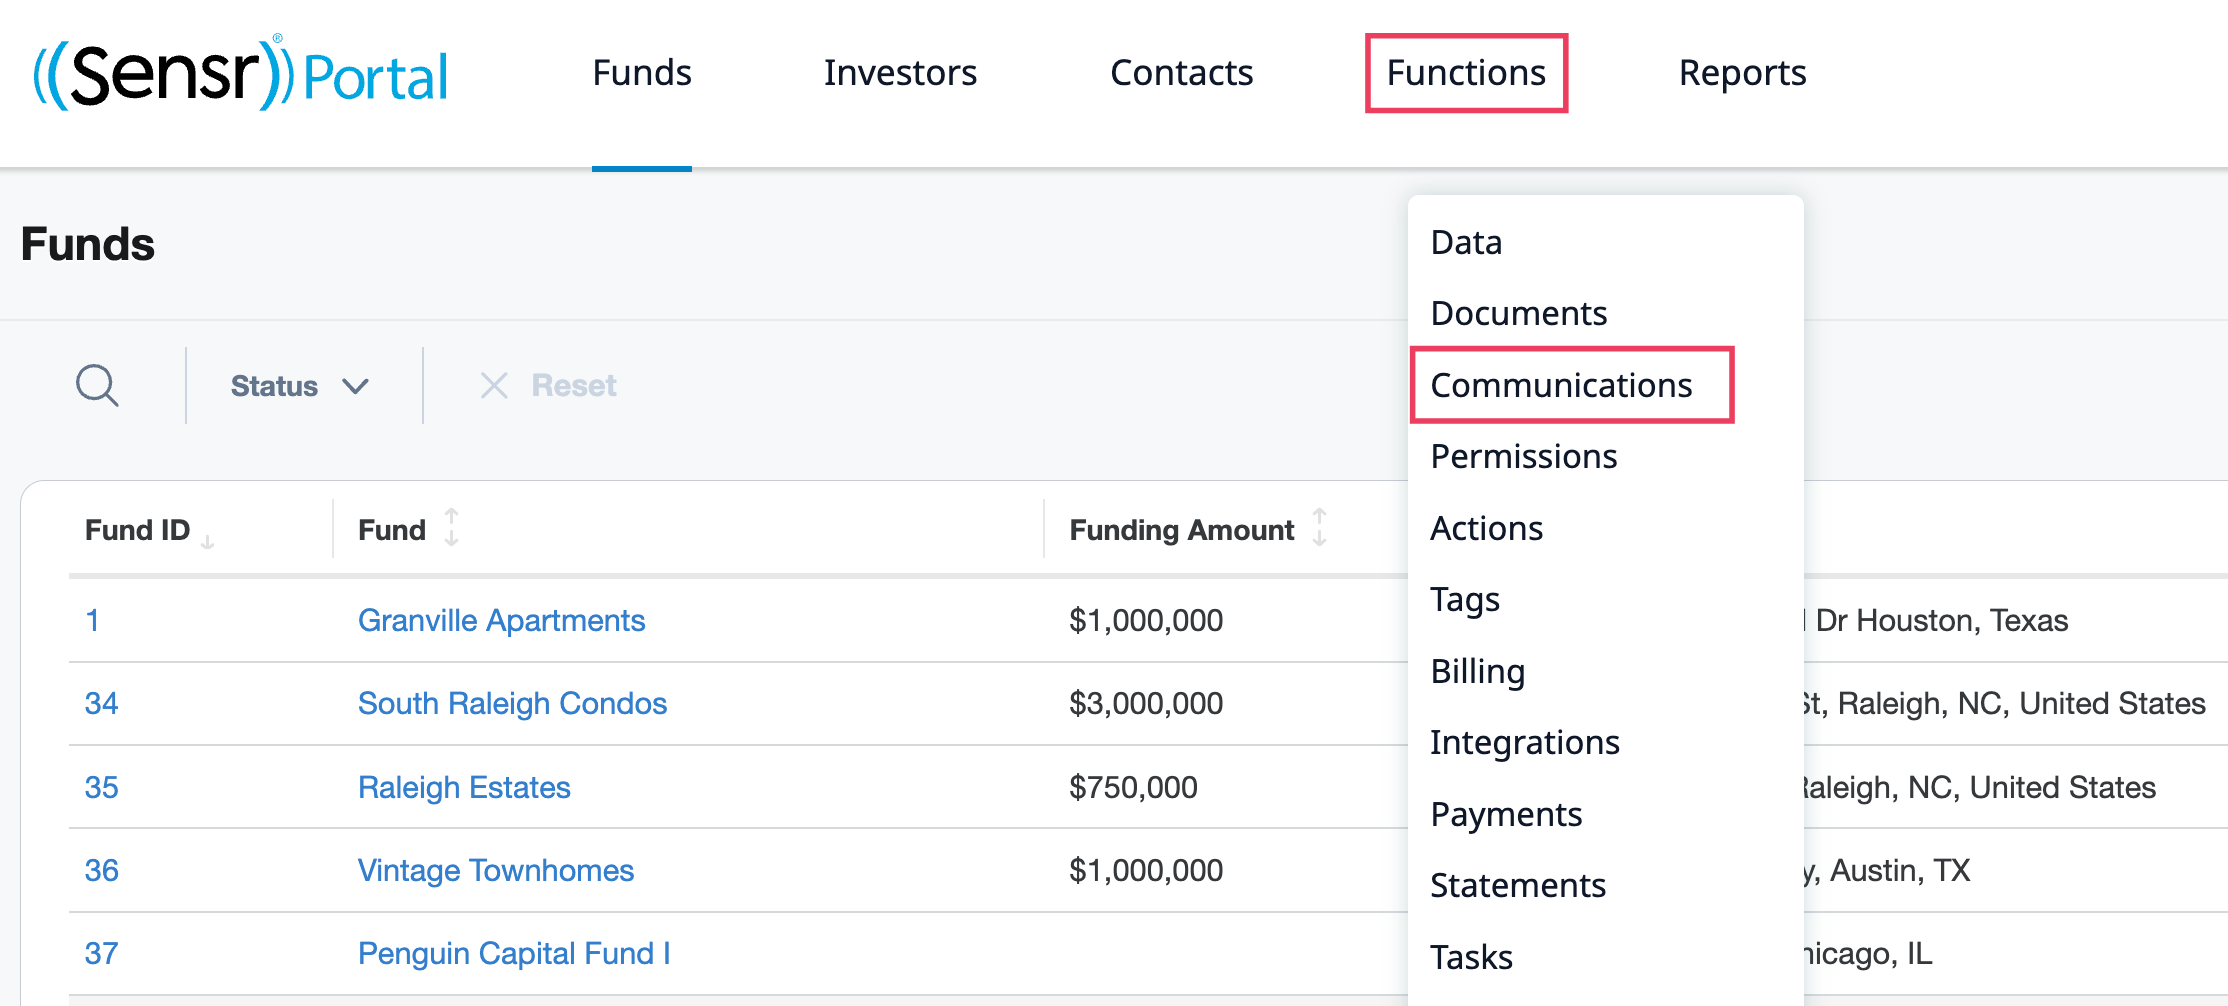
Navigate to Communication page located under the Functions menu.
-
The page is organized in tabs based on communication type. By default, you will land on the Emails tab where an overview of all email details is displayed. To create a new email, click Compose. This launches the Wizard.


Step 1 - Compose Email
Review the various fields and options to complete:
| Field | Description |
|---|---|
| Select the Fund (required) | This will be pre-populated if access from the Funds Page: Emails Tab. Otherwise, select the fund. |
| Select Template (optional) | Select a template from a list of all standard and custom email templates available. By default, the menu is set to None. |
| Subject and Body (required) |
Are left blank, unless a template is selected.
|
| + Add Attachment (optional) | Click to add attachments as Securelinks to the email. Use the checkboxes to include the attachments in email body and/or Fund Updates. |
NOTE: By default, all attachments are sent as securelinks and the ability to include physical attachments is disabled to reduce the risk of data leak. Please contact Customer Success for more information.

Step 2 - Select Recipients
A list displays all contacts related to the fund that have opted to receive emails. Use the available filters, as needed:
- File Upload - lists all Pending and Published file uploads. Selecting the file upload will narrow down to the list of contacts that meet all of the following criteria: *only one bulk upload filter can be applied
- Every contact is associated to the fund through one or more investors
- Every contact has opted in to receive emails
- Every investor can be found in the bulk upload that was selected for the filter
- Every {contact, investor} pair has email permissions turned on for the target folder of the selected Bulk Upload
- Investor - search by Investors included in the bulk upload.
- Contact - search by Contacts
- Tag - search by tag.
- Folder - select recipients based on the available folder permissions.
- Include bulk file uploads as attachments - click to add attachments as Secure links to the email. Checkbox is enabled when a bulk file upload is selected.
NOTE: By default, all attachments are sent as secure links and the ability to include physical attachments is disabled to reduce the risk of data leak. Please contact Customer Success for more information.
IMPORTANT: If a selected bulk upload is in a Pending state, it is not possible to send an email. The bulk upload must be published to the system. If you attempt to send an email with a pending bulk upload selected, a popup appears to let you know the bulk upload must be published before sending the email.

TIP: To learn more about the Include contacts in email body feature, click here.
Step 3 - Review
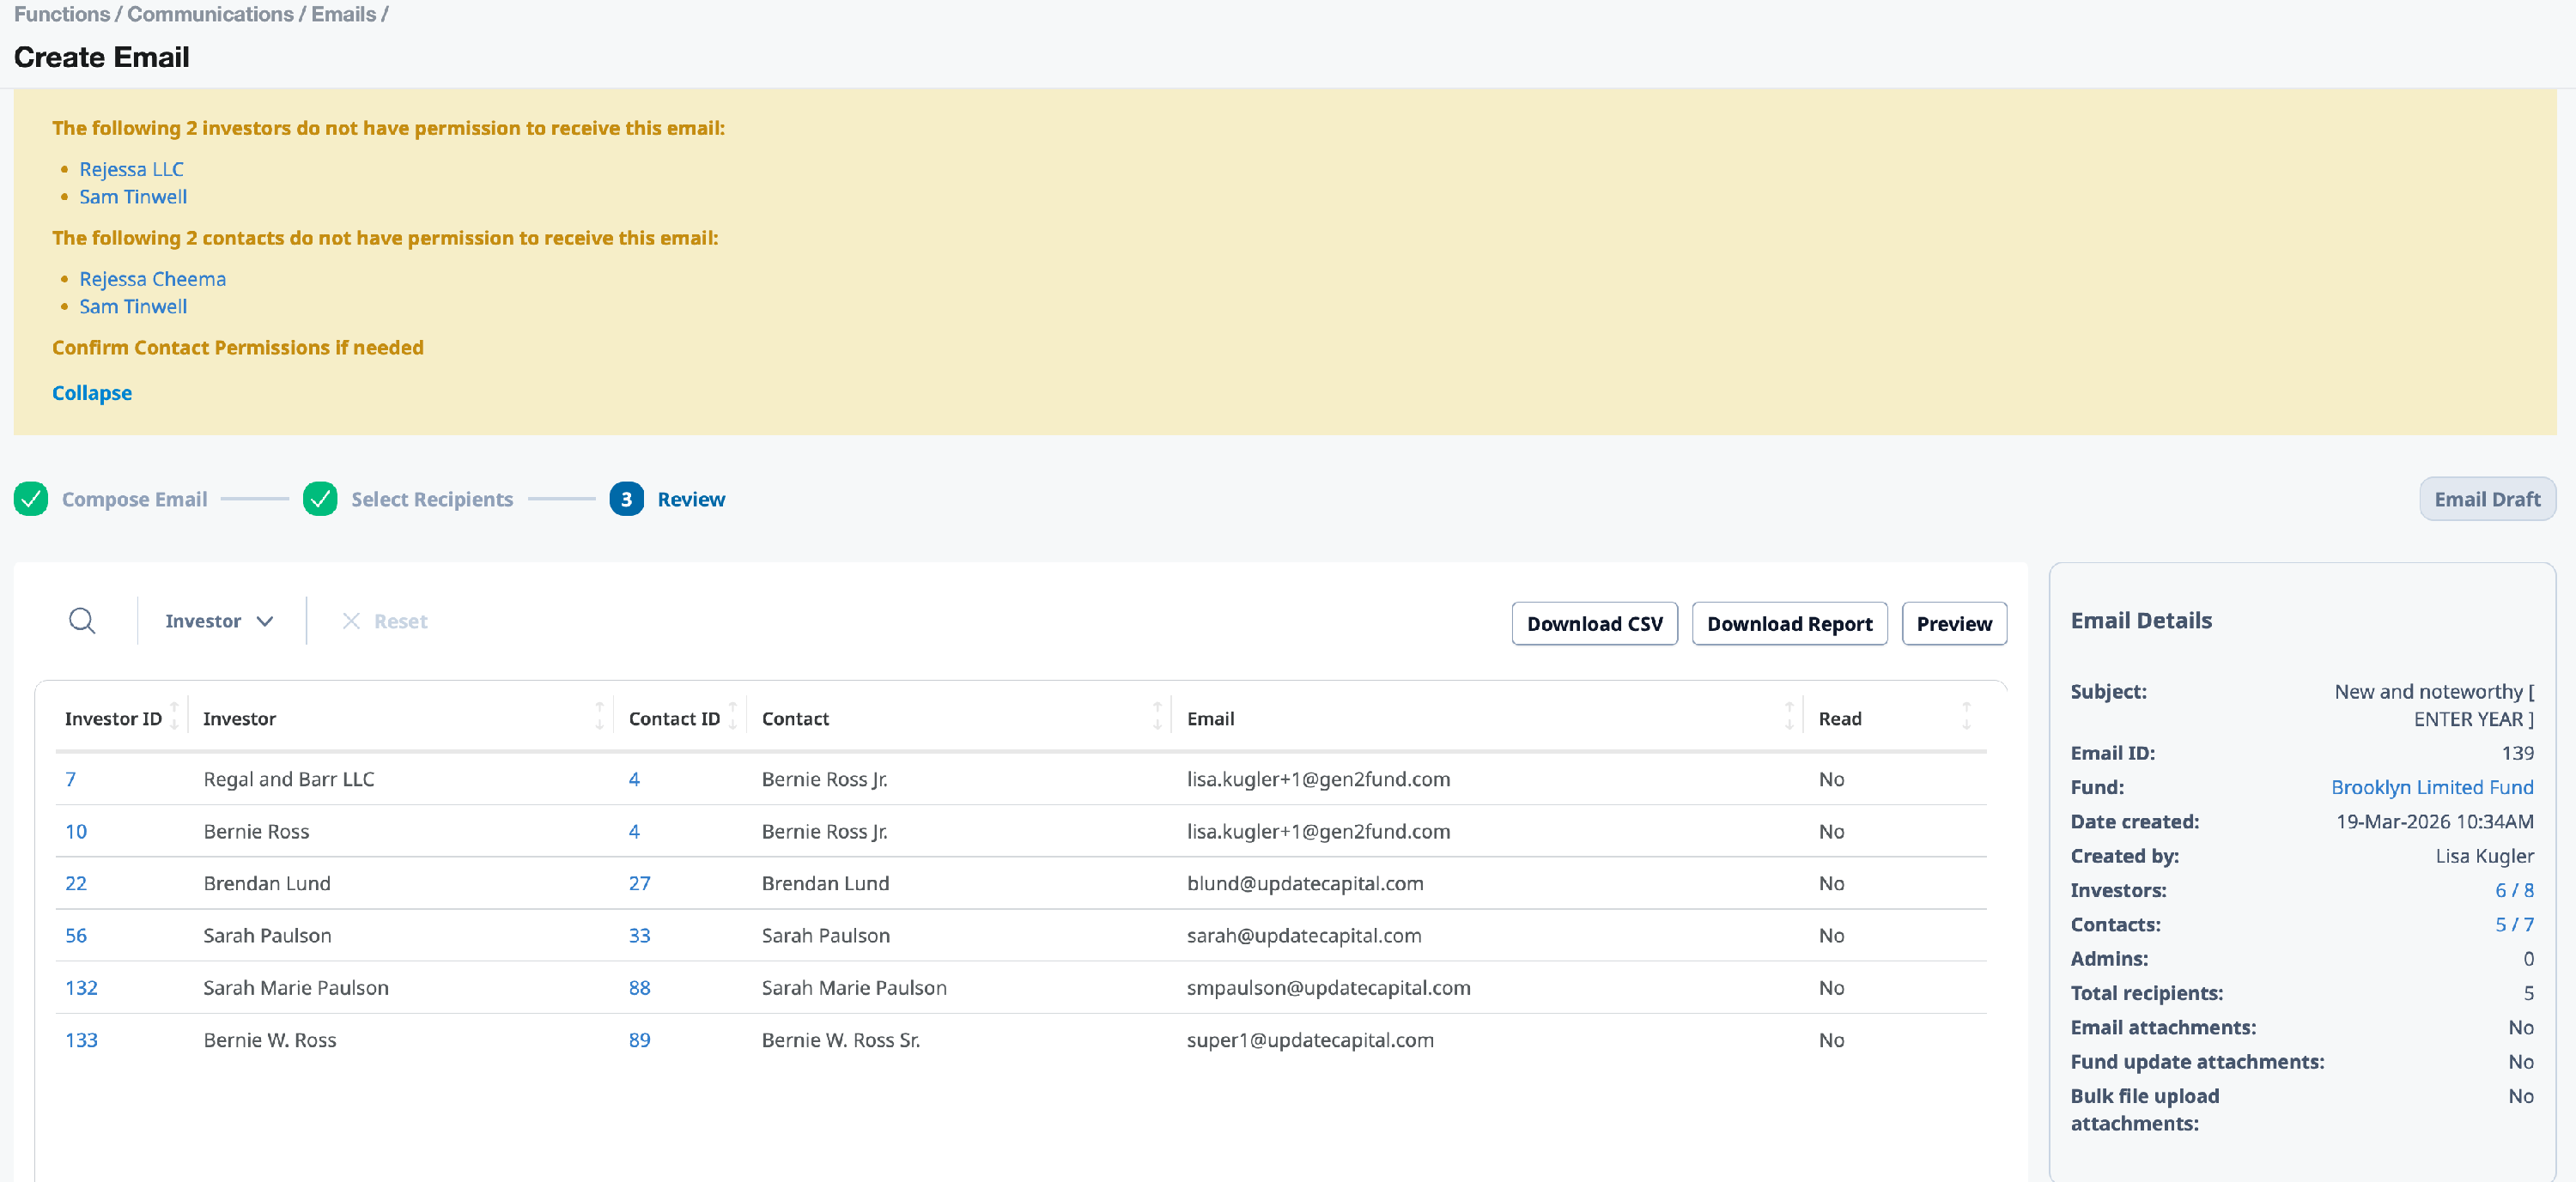
The Review Page shows an overview of all files that are included in the upload. Refer the graphic below for more details.

- Search and Filters - Use the live search and available filters.
- Status - Indicates the status of the email (e.g., Draft, Email Sent, Update Published).
- Download CSV - Downloads the Email Details and the table.
- Download Report - Downloads an Email Report Summary as a PDF.
- Preview - Display a preview of the email and includes the option:
- View as investor/contact - Use the dropdown to preview personalised content for any specific recipient. Note: If used, Email Body and Subject variables will be visible once an investor/contact is selected. *If the Include Contacts in Email Body feature is enabled in your system, the list of contacts will be visible in the preview.
- Send Test Email - Enter one or more email addresses, separated by semi colons and/or commas to send a preview for the test email before sending. *Send test email can only be sent to an Admin email address.
- InvestorID/Contact ID - Displays the investorID/contact ID of the recipients.
- Investors/Contacts with permissions - The number to the left of the forward slash ("/") represents the investors or contacts who have access to the fund and will be sent the email. The number to the right indicates the total number of investors and contacts in the fund that have opted in to receive emails.
- Attachments section - yes/no if documents are attached to the email when being composed, including:
- Attachments - any files added to the email in Step 1
- Fund Updates - if files are included in the fund update in Step 1
- Bulk Upload attachments - if bulk upload attachments are included in Step 1
- Bulk Upload ID - hyperlink to the selected bulk upload page which opens in a new tab.
- Delete - Click Delete to delete the email.
- Back, Publish as Fund Update and Send Email buttons - Click as required.
- Back - to navigate back through the workflow. *Note: once an email is sent, the back option is no longer available.
- Publish Fund Update - to publish as an update on investor portal. *Note: this button is disabled until at least one recipient is selected.
- Send Email - to send the email.
- Resend Email - to send the email again.
- Read status - displays the read status of the email and whether or not the contact has opened the email.
- Permission notification - If there are any associated investors who do not have permissions to access the email, a yellow alert appears.
NOTE: To prevent duplicate email delivery after an email has been sent, the Send Email and Resend Email buttons are disabled until the job is completed. A yellow alert may appear to indicate This email is currently being sent. Please wait for it to complete before resending".
IMPORTANT: Information about Read Status
Email protocols do not have a built-in feature to acknowledge if an email was read or not. To track email read status, Sensr Portal as well as virtually all email solutions (ie: MailChimp, Constant Contact, Salesforce, etc.) use a method called pixel tracking.
Some email apps will block images for privacy reasons and then you'll see Sent rather than Read (e.g. MS Outlook). In other cases, such as Gmail, email apps will open all emails even before a user clicks the email. This is done for performance reasons. However, this will mark all emails as Read.
The bottom line is that for virtually all email solutions, a Read vs. Sent status on emails is correct with most email apps but is not guaranteed.
Accuracy Controls
The Email Wizard has multiple controls to ensure accuracy and completeness prior to sending an email. It is recommended that you review the controls below.
-
Unpublished funds - You cannot compose emails for a fund that has not been published.

-
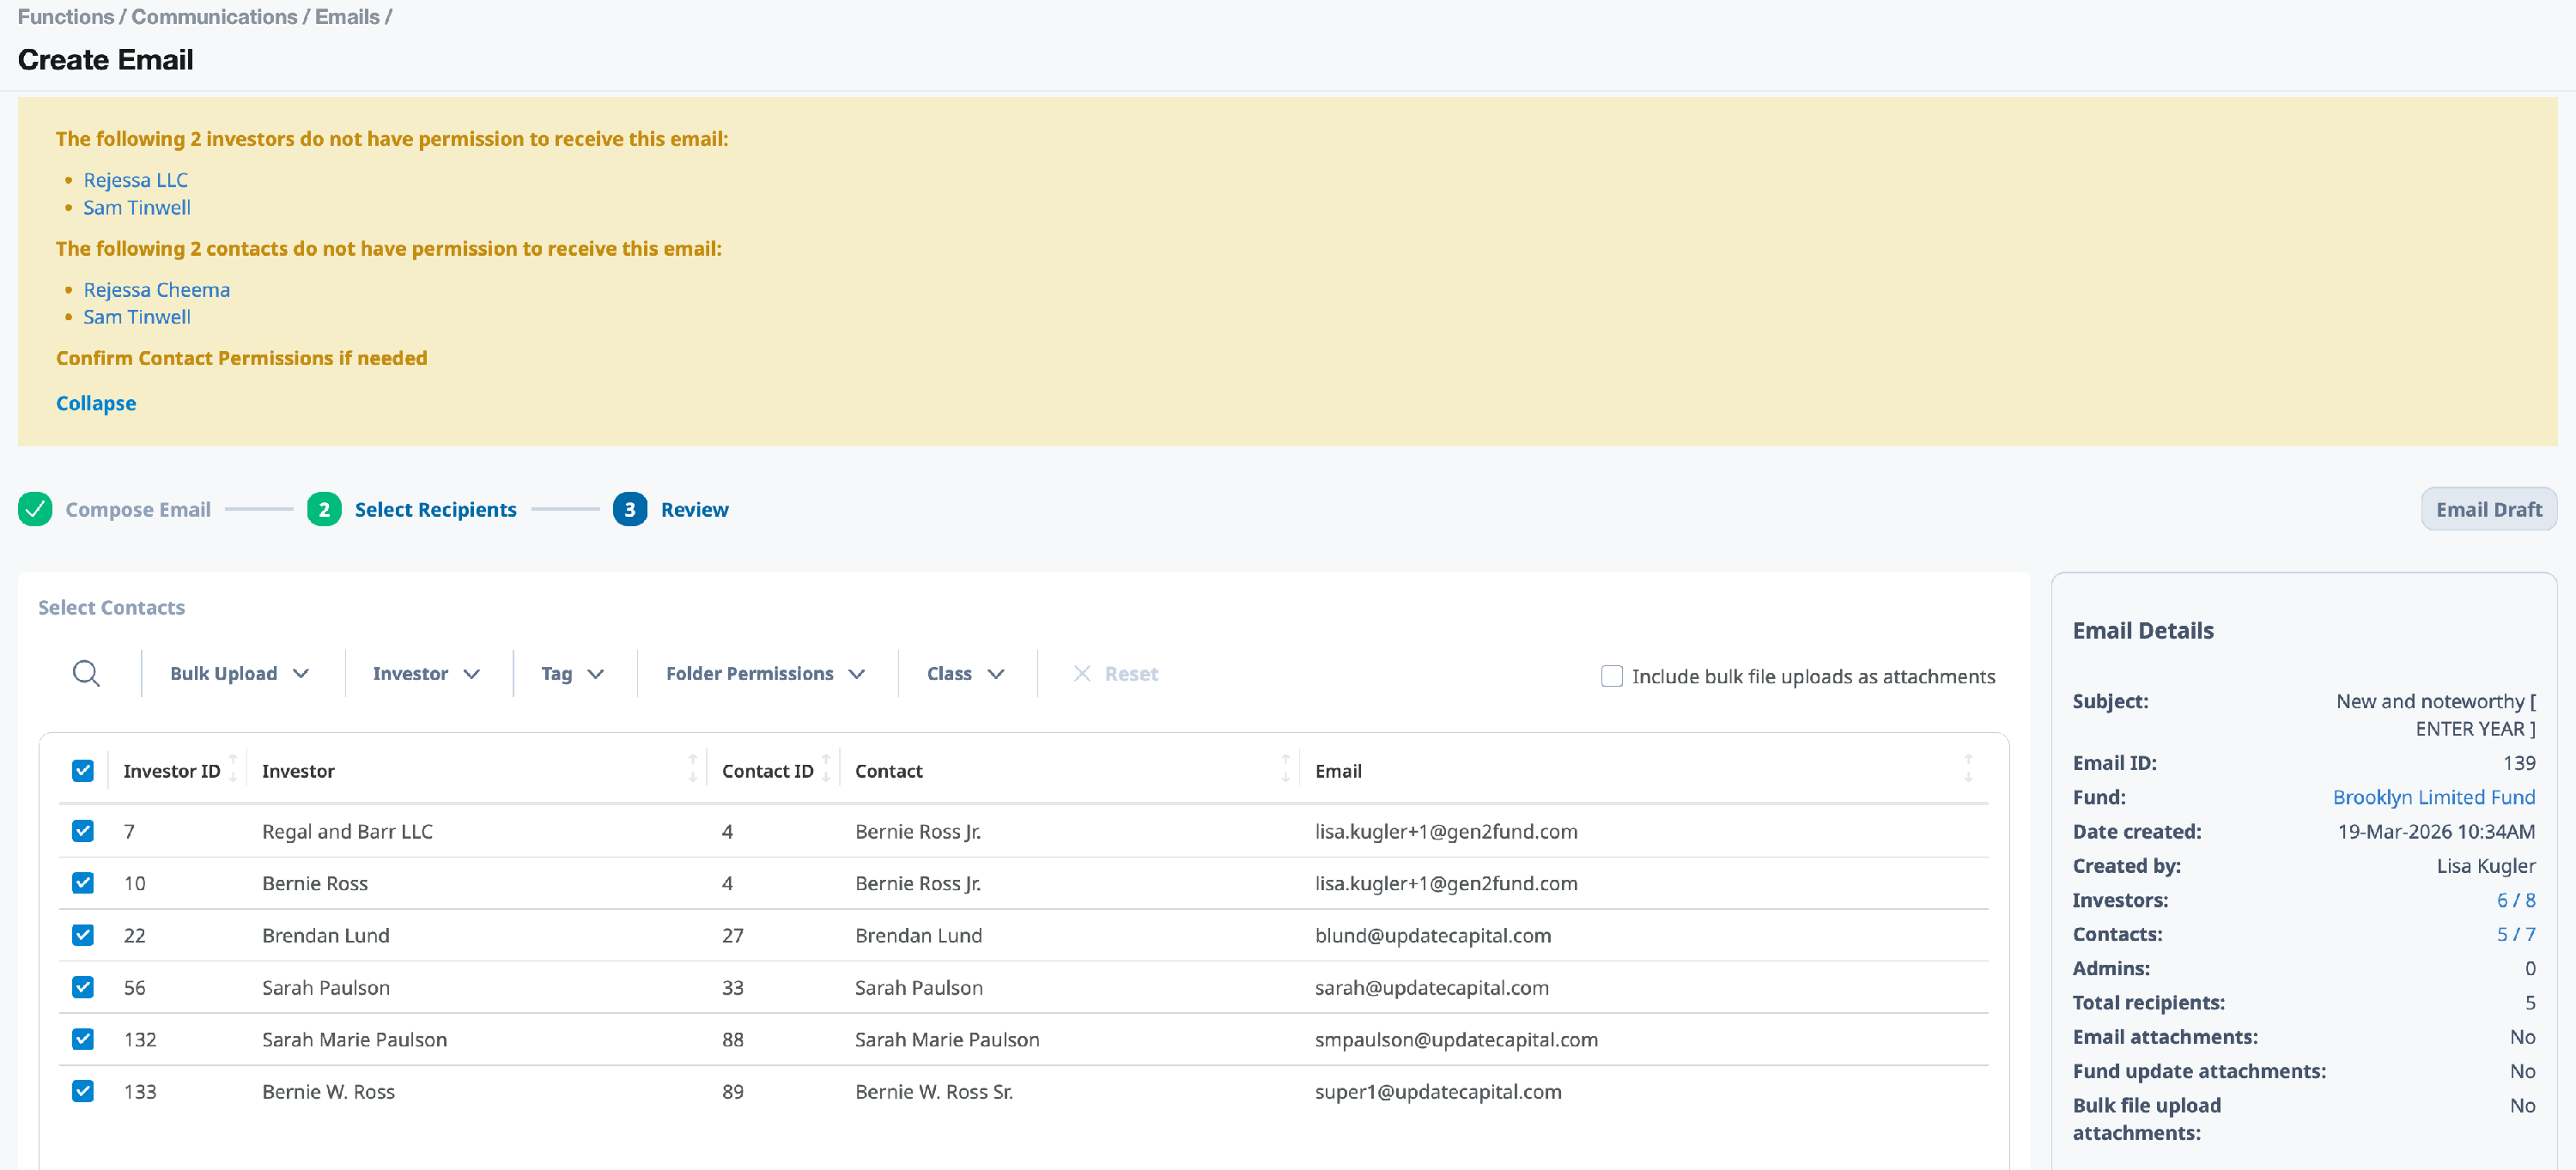
Select Recipients step - a yellow banner displays a list of investors and contacts who do not have permission to receive the email. Confirm Contact Permissions if needed.
-
Select Recipients step - Email Details sections captures the Investors and Contacts counts, excluding investors and contacts that have transfered out, do not have permissions, and/or don't have access to the specific bulk file upload.

-
Step 3: Review - a yellow banner displays a list of investors and contacts that do not have access to receive this email. Confirm Contact Permissions as needed.
-
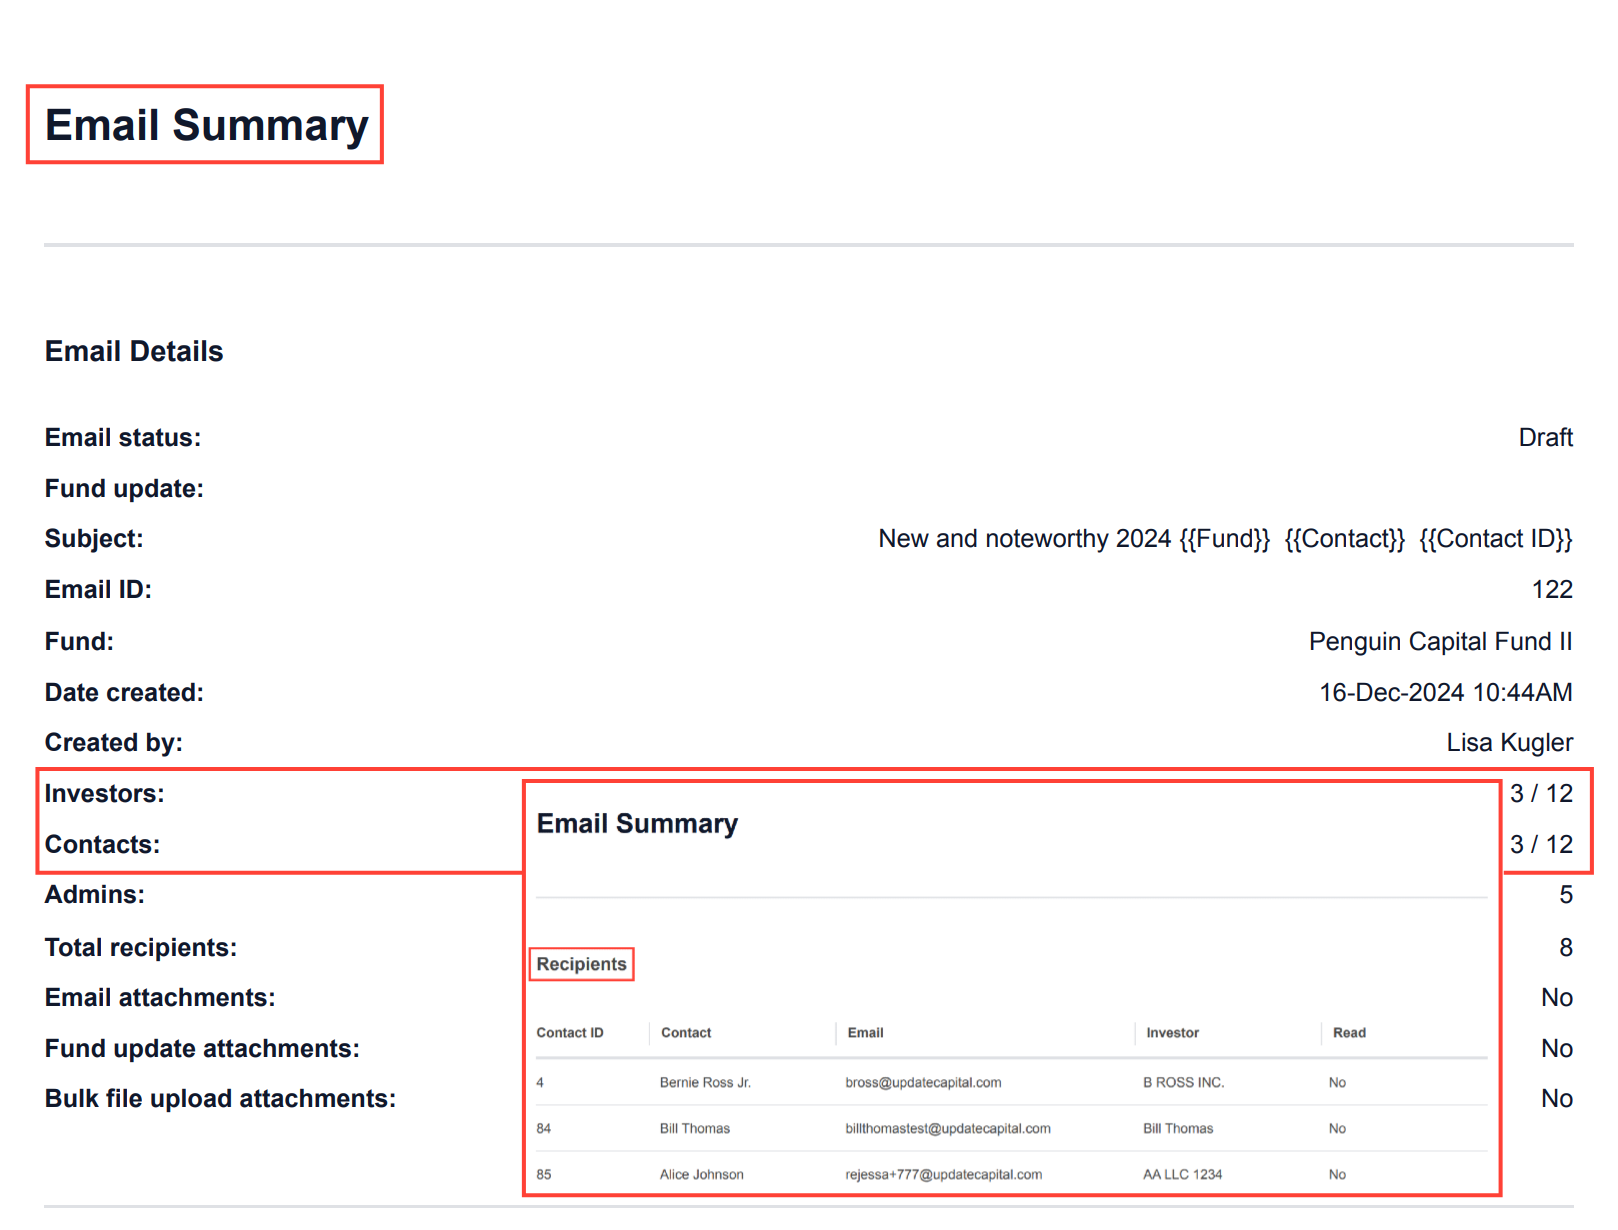
Step 3: Review - use the Download Report button to review the PDF email summary, including recipient list and investor and contact counts.
- Step 3: Review - click the Preview button to use the Test Email feature to validate the list of contacts under the View As menu for accuracy and send a test email.


- Bulk Upload filters:
-
When using a Bulk upload filter to select recipients, the system prevents you from sending the email until the upload is published by displaying the popup below.

If you are in the Review step, and the bulk upload was modified in some way after you arrive at this step, the system will prevent you from sending the email by showing the popup below.

A modified bulk upload could mean one or more of the following:
-
- Recipients were removed from the selected bulk file upload.
- The Investor-file assignment was changed.
- The selected bulk file upload was deleted.

To resolve any of these, return to Step 2, reset the filter and reselect the bulk upload.
Secure Links
Secure Links are a safer way to share documents with investors and contacts without having to send them as physical attachments to email. It allows them to access to the document directly within the portal provided they are logged in and have permissions to view them.
How it works
-
Investors receive an email with hyperlinked filenames (Secure links) of the attached documents.

- Clicking on a link opens a new browser tab at the portal login page. If you do not see the login page upon clicking on the link, this means you're already logged in to the portal.
- Once logged in, the investor is directed to the Documents page, prefiltered to display the relevant document.
- Investors can then view the document by clicking on the document name.

Email Attachment Methods
Email Wizard provides three different ways to add attachments to an email.
| Method | Description |
|
Include attachments in email |
Use the Include attachments in email checkbox to include the attachments in the email body via Step 1: Compose Email. |
|
Include attachments in fund update |
Use the Include attachments in fund update checkbox to include attachments in the fund update via Step 1: Compose Email. |
|
Include bulk file uploads as attachment |
Use the Bulk Upload filter to select recipients and check the Include bulk file uploads as attachments checkbox to add attachments to the email via Step 2: Select Recipients. |
NOTE: By default, all attachments are sent as Secure links and the ability to include physical attachments is disabled to reduce the risk of data leak. Please contact Customer Success for more information.